|
Building the Model Airways 1/16th Scale Sopwith Camel
Partial Kit 8 of 8
The Engine and Propeller
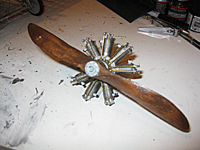
Well this is it. The final kit is here and its time to face
the music and carve the prop.
The last prop I tried to carve was a disaster. Truly
comically awful. Still that was over 30 yrs ago and I was using a pen knife and
a starting with a solid block of balsa. I'm hopeful that better tools and the
head start provided by Model Airways will produce better results this time.
And anyway, it has to better than capping 30 more wing ribs.
Thank god this thing isn't a triplane.
The kit provides three pieces of lasercut 5/32" basswood
already cut to the correct shape. These are glued together to give you the
beginnings of a prop.
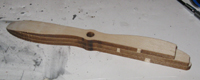
The next step is to do the front to back tapering. In the
photo above, the right side shows the raw pieces. The left side has been
tapered. The front of the prop must be smoothly tapered down from about 3/4"
from the center to the tip with the final contour roughly following the "curve"
defined by the precut pieces. The back side of the prop remains flat. The very rough taper was done with the
X-Acto followed by the dremel with a sanding band attached then finished with
sandpaper.
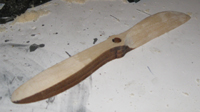
Once the taper is done. The blades need to be shaped. I
started with the front. You need to carve and sand off a lot of wood. The goal
is to produce a smooth curve from the top of the leading edge (the curved side)
to the bottom of the trailing edge. The front edge of the blade should be a
convex curve like the top of a wing. The hub remains a cylinder. The photo above
shows the right side with the front side of the blade now shaped.
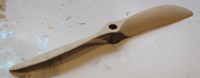
Once the fronts of the blades are shaped, the back side must
be carved out. The back side is a concave surface that should follow the
contours of the front side. You need to work slowly here so as not to make the
blade too thin or even sand right through it.
It took a few hours of careful work to get the blades shaped
properly and I would have found it impossible without the dremel sanding bit.
The dremel
can remove a lot of wood very quickly, but boy does it generate a lot of
sawdust.
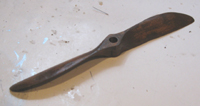
After a final sanding, the prop gets a mahogany stain and
some varnish and I can breath again (or at least I'll be able to after all the
sawdust settles). For a plastic modeler, the prop is easily the biggest
challenge in the kit as there's really nothing we do in that realm that's
comparable.
Next up is the engine. Piece of cake. This is all white metal
with a bit of brass and is basically gluing pieces together.
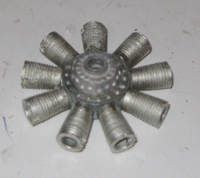
First the cylinders are attached to the crankcase.
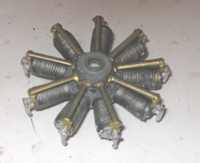
Followed by the cylinder heads, intake rocker arms and intake
manifold pieces. Rotary engines don't have an exhaust manifold, the cylinders
just exhaust into the air which is why they're prone to throwing castor oil all
over the place.

Next, the ignition ring, spark plugs and wires go on.
Then the exaust rocker arms and the push rods which are cut
from a length of brass rod. Then the engine and prop are attached to a 1/8" x 2
3/4" brass rod. On a rotary engine, the prop is attached directly to the
crankcase and the whole engine rotates around the crankshaft.
The brass rod is inserted into the brass tubing in the
fuselage and the thing is done. After several months, some frustrations and some
triumphs, I have a Sopwith Camel.
Final Thoughts
So did it turn out like I hoped?
Well certainly as we'll as I realistically hoped -
probably better. This was certainly one of the most challenging kits I've ever
built, but I'm not sure it was really any harder than some of the advanced
plastic stuff I've done. The challenges are different. This kit requires a lot
of cutting and manufacturing of parts that plastic kits don't require and the
lack of locating tabs and pins means you need to use jigs and measure and align
in ways that plastic kits don't require.
On the other hand, plastic kits require a degree of finishing
that is orders of magnitude beyond what is reguired here. There's no real
painting with this kit, no decals, and no seams to be hidden. Indeed the nature
of this kit allows for a certain sloppiness that would never be tolerated with
plastics. For instance, the rocker arm bases on the engine don't fit tightly
againt the crankcase - theres a slight gap in front. That would get laughed off
the floor at an IPMS contest; but with this kit it just seems to emphasize the
handbuilt nature of the thing and is almost a plus.
I would never recommend this to a beginning modeler, but any
one with some experience should be able to pull it off.
The bottom line is that it was fun and that's what it's
really all about.
|