|
Building the Model Airways 1/16th Scale Sopwith Camel
Partial Kit 6 of 8
The Landing Gear
Part 6 of the kit is clearly the easiest step and consists of
mounting the bottom wing and installing the landing gear. It's just a few hours
work.
Step one is to attach the bottom wing to the fuselage. This
is simply gluing the wing spars into the slots in the fuselage
bottom. Unlike the plastic kits I'm used to, you have to be very careful that
the wing is perpendicular to the fuselage center line (when viewed from the top
and from the front) and that the angle of incidence is correct.
Once the wing has dried it's time to mount the gear struts.
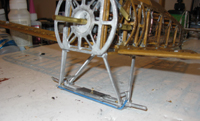
The gear assembly is basically three white metal pieces.
Before assembling them, you need to drill some small holes and glue the rigging
eyebolts in place. There are three eyebolts on the gear pieces and three more on
the fuselage.
Glue the struts to the end of the crossbar and then glue them
to the fuselage bottom. Once again, there are no aligning holes, so use a slow
drying glue to allow time to make sure everything is even. The struts should
have the same toe out angle viewed from the front and the lower wings tips
should be at the same height. The gear crossbar should be parallel to the wing
spar.
I used a rubber band to clamp the struts to the
crossbar while the glue dried.

There are three rigging wires to attach, then assemble and
mount the wheels. The wheels have an inner and outer half, a brass bearing and
use rubber o-rings for tires. The instructions suggest waiting until after the
next step to attach the hub pieces which hold the wheels in place.
Presumably the wing rigging is easier if the wheels are not in the way.
That's it for kit 6.
Getting Adventurous
The problem with Step 6 is that it's too short. With time
left on my hands (always a dangerous thing with a modeler), I decided to "fix"
some problems with the fuselage that have been bugging me for a while.
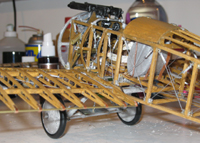
First, and easiest, I got some 5/32" square brass tubing and
used it to extend the shell ejector chutes for the machine guns.
Next, I used some extra 1/32" by 3/32" strips (used for the
rib caps) and some 1/8" sq. strips (used for the fuselage ribs) and added the
curved ribs to the outside of the front two fuselage bulkheads that would
have supported the plywood and metal cowlings. Adding these helps give the
impression of the rounded front fuselage that is characteristic of the Camel.
Also, after much debate, I decided to add the plywood decking
over the fuselage section directly behind the cockpit. The kit leaves this area
open, I assume to allow the fuel tanks to be easily seen. But I decided that it
just didn't look right that way.
I took a small piece of 1/64" basswood sheet, drilled holes
for the fuel tank filler caps, soaked it in water so it would bend, and glued it
over the opening. I think it looks much more like a Sopwith Camel with the piece
in place.
On the real airplane, the fuselage sides around the cockpit
are also plywood covered. I very briefly thought about adding these pieces, but
decided it would hide too much of the cockpit detail and that it would also look strange
unless I went ahead and added the metal cowling which was definitely out.
Next up is mounting and rigging the top wing.
STEP 7 - Mounting the Top Wing
|